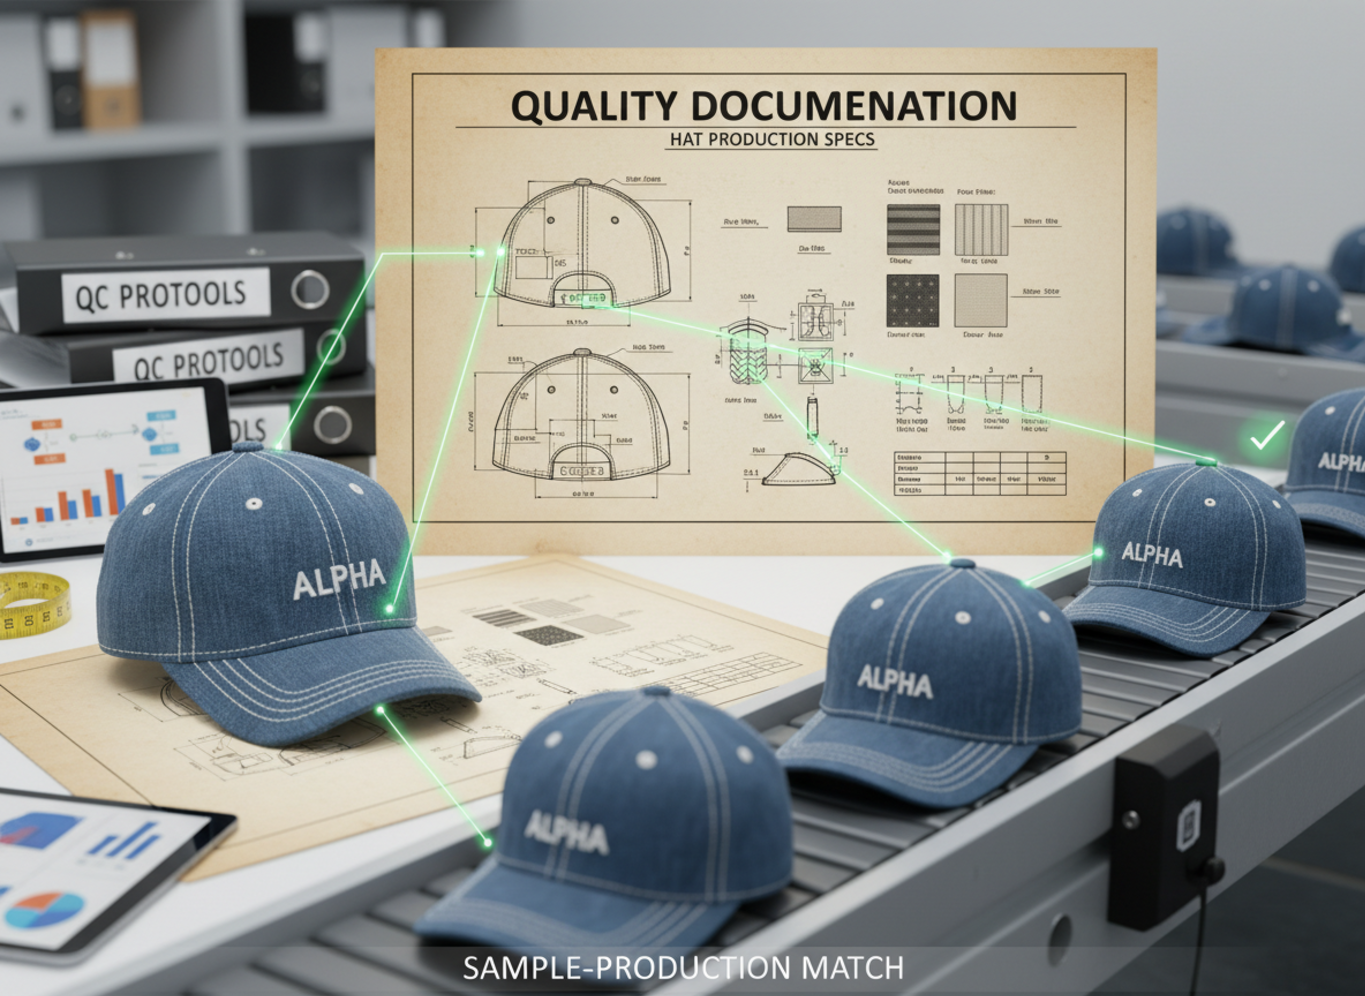
You love the sample, but the final hats arrive looking terrible. It destroys your brand’s trust. You must demand specific documents to ensure consistency from start to finish.
To prevent mismatches, always demand a detailed Tech Pack1, a physical "Golden Sample" signed by both parties2, and a pre-shipment Quality Control (QC) report3. These documents create a binding standard for materials, colors, and stitching accuracy4 that the factory must follow.

I have seen many new brand owners lose money because they trusted a verbal promise. Do not let this happen to you. Let’s look at exactly what you need to ask for.
How do you inspect custom hats for quality?
You open the box and the logos look crooked. Your customers will notice immediately. You need a standard way to check every single hat.
Inspect custom hats by checking three key areas: visual aesthetics (logo alignment, color match)5, structural integrity (stitching strength, brim shape)6, and sizing accuracy7. Use a measuring tape8 and compare directly against your approved sample9.

When I help clients inspect their goods, I tell them to put emotion aside and look at the facts. You need to be systematic. Do not just look at the hat; really examine it. I usually break this down into a specific checklist. If you do not have a checklist, you will miss small details that your customers might complain about later.
First, look at the "face" of the hat. The center embroidery must be perfectly centered. If it is a 5-panel hat10, it should sit right in the middle of the front panel. If it is a 6-panel hat11, it should bridge the center seam evenly. Next, check the stitching. Loose threads12 are a sign of rushed production. Pull gently on the seams. If you see gaps, the tension is wrong.
Then, check the inside. The sweatband13 should be smooth, and the inner taping14 should be clean. Finally, check the shape. Place the hat on a flat table. Does the brim sit flat? Is the crown symmetrical? If one side looks collapsed, the fabric backing is poor.
Here is a simple table to help you organize your inspection:
| Inspection Area | What to Look For | Common Defects |
|---|---|---|
| Visual | Logo placement, color accuracy, clean fabric. | Crooked logos, wrong thread colors, oil spots. |
| Structure | Brim curve, crown shape, button placement. | Warped brims, crushed crowns, loose top buttons. |
| Internal | Sweatband stitching, label placement, taping. | Puckered sweatband13s, missing size labels, messy threads. |
| Sizing | Circumference, depth, brim length. | Too tight, too shallow, inconsistent sizes. |
What certifications should a hat factory have?
You want to sell ethical and safe products. Uncertified factories might use bad chemicals. You need proof that your manufacturer follows international standards.
A reliable hat factory should hold certifications like ISO 900115 for quality management, BSCI or SMETA16 for social compliance, and OEKO-TEX for material safety. These prove the factory operates legally and produces safe, non-toxic headwear.

Certifications are not just pieces of paper on a wall. They are your safety net. In my experience at Anthea, working with brands in Europe and North America means we must prove we are safe and reliable. If you are building a serious brand, you cannot risk selling a hat that contains lead in the dye or was made by forced labor.
Let’s break down the three main types of documents you should ask to see. First is Quality Management. The most common is ISO 900115. This does not guarantee your design is pretty, but it guarantees the factory has a system to fix mistakes. It means they don’t just guess; they follow a process.
Second is Social Compliance. Your customers care about who makes their clothes. Certificates like BSCI (Business Social Compliance Initiative)17 or SMETA16 show that the workers are treated fairly, paid correctly, and work in safe conditions. This is a huge selling point for your marketing.
Third is Product Safety. This is critical for materials. OEKO-TEX Standard 10018 is the gold standard here. It tests for harmful substances. If a factory cannot prove their fabric is safe, do not buy from them. You do not want a customer getting a skin rash from your hat.
| Certification Type | Example Names | Why You Need It |
|---|---|---|
| Quality Management | ISO 900115 | Ensures the factory has a consistent process to reduce errors. |
| Social Compliance | BSCI, SMETA16, WRAP | Proves ethical labor practices. Protects your brand image. |
| Material Safety | OEKO-TEX, REACH19 | Ensures fabrics and dyes are free from harmful chemicals. |
| Environmental | GRS (Global Recycled Standard) | Verifies recycled materials if you sell eco-friendly hats. |
How do you approve a custom hat sample before production?
Rushing the sample approval is a rookie mistake. If you miss a detail now, you pay for it later. You must be strict during this phase.
Approve a custom sample by checking the "Golden Sample." Verify the Pantone colors, measure the embroidery size, test the fit, and take photos. Only authorize mass production after you sign and date this physical sample.

The concept of the "Golden Sample" is the most important thing I can teach you. A Golden Sample is the final, perfect version of your hat. It is the standard that all mass-produced hats must match.
Many beginners make a huge mistake: they approve a sample based on photos sent via WhatsApp or Email. This is dangerous. Photos hide bad fabric textures. Photos hide poor fit. Photos cannot show you if the brim feels cheap and cardboard-like. You must pay the shipping fee and get the hat in your hands.
Once you have the hat, wear it. Does it fit your head comfortably? Measure the logo. Is it exactly 5cm wide, or is it 4.8cm? Check the colors against a physical Pantone book, not your computer screen. Screens distort colors.
If everything is perfect, you do two things. First, you sign a tag, attach it to the hat, and send it back to the factory. This becomes the "Sealed Sample" or "Golden Sample." The factory keeps this on the production line. Second, you keep a duplicate perfect sample for yourself. If the bulk order arrives and looks different, you have physical proof to show the factory.
| Approval Step | Action Required | Why It Matters |
|---|---|---|
| Physical Review | Touch, feel, and wear the sample. | Photos cannot show texture or fit comfort. |
| Measurement | Use a ruler on all logos and panels. | Ensures the design proportions are correct. |
| Color Match | Compare fabric to Pantone chips. | Screens display colors differently than real life. |
| Sign Off | Sign and date the sample tag. | Creates a legal reference for the agreed quality. |
| Duplication | Keep one sample, return one. | Ensures both you and the factory have the same standard. |
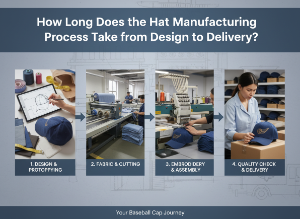
What quality checks are needed during custom hat production?
You cannot wait until the hats arrive to find errors. By then, it is too late to fix them. You need checks while the machines are running.
Effective production requires three specific quality checks: Pre-production (material verification), Inline inspection (checking semi-finished caps during sewing), and Final inspection (examining finished goods before packing). This multi-step process catches errors early.

Quality control is not a one-time event at the end. It is a process that happens throughout the manufacturing timeline. If you wait until the hats are in boxes to check them, and you find a mistake, the factory has to remake everything. That causes huge delays.
The first stage is the Pre-Production Meeting (PPM). This is where the factory manager checks the materials against your Golden Sample. They check if the fabric roll color matches the sample. They check if the backing material is the right thickness. If the raw material is wrong, the hat will be wrong.
The second stage is the Inline Inspection (DUPRO – During Production). This happens when about 20% of the hats are sewn but not yet finished. We check the embroidery panels before they are sewn into the hat shape. It is much easier to throw away a bad panel of fabric than to throw away a finished hat. We check if the sewing machines are running at the right tension.
The third stage is the Final Random Inspection (FRI). This happens when the hats are finished and packed. We use a standard called AQL (Acceptable Quality Limit)20. We pick a random number of boxes, open them, and check the hats. If we find too many defects in that small sample, we reject the whole shipment. You can hire third-party agencies to do this for you if you cannot travel to the factory.
| Inspection Stage | When It Happens | What is Checked | Goal |
|---|---|---|---|
| Pre-Production | Before sewing begins. | Raw fabrics, threads, accessories, Golden Sample. | Prevent wrong materials from being used. |
| Inline (DUPRO) | 10%-30% complete. | Semi-finished panels, logo embroidery, stitching. | Catch machine errors early to avoid waste. |
| Final (FRI) | 100% packed. | Finished appearance, packaging, barcodes, shape. | Ensure only good products leave the factory. |
| Loading Check | During shipping. | Cartons, shipping marks, container condition. | Ensure goods are not damaged during loading. |
Conclusion
Success lies in documentation. Use Golden Samples, check certifications, and demand detailed QC reports. This ensures your bulk order matches your vision perfectly every time.
-
Shows every spec the factory must follow—materials, stitching, measurements—so production can’t “guess” and drift from your design. ↩
-
Creates a shared, enforceable reference sample so you can prove what was approved if bulk goods arrive different. ↩
-
Gives documented pass/fail results before shipping so you catch defects early and avoid costly inventory you can’t sell. ↩
-
Learn how to lock specs contractually so the supplier is accountable for consistency from sampling through bulk production. ↩
-
Helps you spot the most customer-visible issues fast—misaligned logos and off-colors that trigger returns and bad reviews. ↩
-
Prevents failures like popped seams or warped brims that make hats feel cheap and damage perceived quality. ↩
-
Ensures consistent fit across units, reducing complaints about hats being too tight, shallow, or inconsistent. ↩
-
Provides a simple, repeatable way to verify circumference, depth, and brim specs against the approved standard. ↩
-
Shows a practical method to benchmark every key detail so bulk production doesn’t drift from what you accepted. ↩
-
Gives precise placement guidance so logos sit centered and professional on common 5-panel constructions. ↩
-
Explains seam-bridging alignment so your front logo looks balanced instead of crooked or split awkwardly. ↩
-
Teaches you how to identify rushed workmanship and decide when to rework, reject, or tighten process controls. ↩
-
Improves comfort and durability checks—poor sweatbands cause irritation, peeling, and immediate quality complaints. ↩ ↩
-
Helps you judge finishing quality inside the hat—clean taping signals better workmanship and fewer irritation issues. ↩
-
Clarifies whether the factory has documented processes to prevent repeat defects and handle corrective actions reliably. ↩ ↩ ↩
-
Explains what SMETA checks (labor, health & safety, ethics) so you can evaluate supplier risk more confidently. ↩ ↩ ↩
-
Shows how to confirm ethical labor practices—useful for brand trust, retailer requirements, and marketing claims. ↩
-
Protects customers and your brand by ensuring materials are tested for harmful substances and skin-safety risks. ↩
-
Helps you avoid restricted chemicals and costly compliance issues when selling in the EU or to strict retailers. ↩
-
Teaches a standardized sampling method to accept/reject shipments based on defect rates—critical before goods leave the factory. ↩